3-Tier Application Using RMI
Here I am providing a 3-tier client/server application using Oracle as the database, RMI remote object as
application tier and a swing frame or a console application as the client.
This application is built with NetBeans IDE 5.5. You can download both server and client
projects using the links below.
Server project (empserver) - empServer.zip
Client project (empclient)- empclient.zip
Steps related to empserver (server ) project.
- First make sure you downloaded empserver.zip
- Unzip empserver into any directory. It will create a directory with the name
empserver
- Start NetBeans IDE 5.5 and open the project by selecting
empserver as the
folder
- This project needs to have Oracle JDBC driver, which is in OJDBC14.jar
file. So include that
in empserver project using libraries node in project window. This
application is using Oracle10g XE (Express Edition). In case you are using
some other Oracle version, please change connection process accordingly in Database.java
file. In this case, you may also have to change the table name and column
names in EmpImpl.java.
- Build the project.
- Class files related to .java files are placed in build/classes
directory of empserver project.
- Go to command prompt. Go to directory build/classes in empsever project directory.
- Run RMIC command as shown below from build/classes directory
RMIC employee.EmpImpl
- Run RMIRegistry from the build/classes directory as follows
RMIRegistry
- Come to NetBeans IDE 5.5 and run EmpImpl.java. Make sure it is displaying
a messaging saying "Employee Server Ready".
- The following are the files related to empserver project:
- EmployeeTO.java - This is Employee class using Transfer Object design
pattern
- EmployeeNotFoundException.java - User-defined exception for employee not found
- Database.java - A class to connect
to database.
Whenever a change in database is required, only this class is to be modified.
- Emp.java - Remote interface
- EmpImpl.java - Implementation class
Steps related to client:
- First make sure you downloaded empclient.zip
- Unzip empclient into any directory. It will create a directory
with the name empclient
- Open the project by selecting empclient as the folder
- Go to libraries node in Project window and select
Add Jar/Folder option.
- From the dialog box, select empserver/build/classes directory as the directory
to be included in client project. This steps is required as some components required
by client are placed in employee package which is in build/classes folder of empserver.
- Build the project.
- Run EmpClient.java. It should display details of employee with id 100.
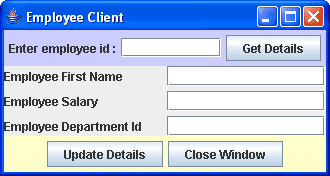
- Run EmpSwingClient.java It provides textfield to enter employee id. Enter 100 and
then click on Get Details button. Once details are obtained, change salary in second
textfield and click on update button. You can check whether salary is changed or
not by click on Get Details button to get details of employee id 100 again.
- File related to empclient projects are :
- EmpClient.java - Console client.
- EmpSwingClient.java - Client based on Swing Frame.
- The following is the snapshot of Swing Client.

Good Luck,
P.Srikanth.

